Friday, January 29, 2016

Wild Horses Circling the Log Cabin

This quilt was begun more than a year ago, as a gift to thank a neighbor.  I lost interest in working on it when I discovered that the horse print purchased for the border didn't really work.  It was buried and unearthed several times, then I found a different horse print that worked better.  Some extra of the first print (but not quite enough) was purchased and pieced together to put on the back.

Over the Christmas holidays our entire family worked on quilting the quilt together.  We watched movies, visited, and just spent time together.  Instead of quilting next to each and every line, we quilted long, straight lines in the light and dark sections of the Log Cabin pattern, quilting a rope motif down the centers of the lighter patches.

This quilt was completed because of my husband's enthusiastic encouragement, and he willingly worked on it, discovering that he has a good talent for it.  Our oldest son made three stitches, which were worked as he chanted his love for our neighbor.  Our youngest son's stitches were carefully made, but they are pretty long on the bottom of the quilt.  He told me he was proud of those stitches!  I know our wonderful neighbor will recognize that they are a representation of his love.

My husband's favorite fabric is the blue batik, and I wish I had purchased more of it when a local Walmart was clearing out its expensive fabrics for $1 a yard!  He really likes the touch of the blue in this quilt and wanted me to use it in the border, but it was wrapped up in another piece and could not be found in time.  The batting is a packaged 100% cotton.

When we took it off the frame we washed it to make sure that the colored pencil we had used to mark the quilting lines would come out.  I like the puckery look that shrunken cotton batting makes when it is washed.  Last week my daughter and I finished stitching the binding and we delivered it to our friend and his wife. 

I am thankful for the experience of unity and love this project fostered in our home.

New Quilt From Old

The first week of this year brought an eight-hour trip to Oregon to visit my mother.  Actually, the trip was delayed and took longer than usual, since I was shop hopping to locate some fabric to help her friend complete one of her quilts!  I found a couple of prints in a lovely store in the heart of a rural Idaho town; though they were not exactly what she was looking to match, they ultimately worked for her project.

When I arrived, I asked what Mom wanted me to help with.  We planned to move her sewing room from the rooms on the main floor into the upstairs bedroom across from hers; we wanted to finalize the design on Dad's headstone; we needed to update and reorganize the photographs on the Grandchildren Wall; and she wanted me to recreate the pattern for the quilt design of an antique quilt fragment she had.

We got a lot done!  We spent one day with her UFO group and I worked on the quilt top design that day.  Yes, we visited the monument store and hauled furniture and fabric.  We printed up photos and organized the wall to include everyone -- even the Future Possibles.  She prepared a couple of quilt backs and I stitched binding onto one of her completed quilts.  It was a full and busy week, and I managed to avoid snowstorms both directions.

I like the way the quilt design turned out and plan to use it on a future quilt.  The baby quilt top is complete, in soft mint and a muted 30's reproduction print.  The print squares are 4" and the X blocks are 3 1/2" squares.  The original was stitched by hand.


Thursday, June 12, 2014

Loose Change


My mother's church group in Oregon decided to hold a quilt show last year -- and it was so well-attended and so fun, they did it again this year!

For this years' show, the group issued a challenge that they called "Loose Change."  It was encouragement to people to go through their fabric stashes and use what they had.  Nickel packs (5-inch squares) were designated as "nickels"; "dimes" were 10-inch squares (otherwise sold as "Layer Cakes"); fat quarters were "quarters," of course; scraps were "pennies"; and 2 1/2-inch strips (often rolled together in sets and marketed as "Jelly Rolls") were designated as "dollars."  Over the first months of the year, Mom and her friend Debbie had plans to teach classes to show creative ways to use these elements in the creation of new quilts for the challenge.

Sadly, Mom was unable to participate much in teaching these classes.  Dad was hospitalized shortly after Christmas and spent about six weeks in critical condition in a hospital three hours from home.  Mom was given use of a room in the hospital and she took projects and sewing machines, but her time and focus was really spent helping Dad.  He passed away a couple of weeks before the quilt show, which was held in mid-April.

In January and February I went to stay with Mom.  We visited and planned late into each night, ate at restaurants, and did some fabric shopping.  She expressed interest in having a quilt pattern to give away at the upcoming quilt show that could use each form of their "loose change."  She also wanted to make a creative quilt that looked like it had money on the front and she found some fabric to put on the back that looked like dollar bills.  We had so many ideas!

Inspired by a quilt design we saw on the wall of a quilt shop, I came up with a pattern and made it in two colorways.  The first was done in kelly green batiks, along with other fabrics in hues suggestive of dimes, nickels, pennies and golden dollars; the other (surprisingly more popular) was in white with green  30's and 40's reproduction fabrics.  My sister, expecting her second child, expressed an interest in having the green one to match her children's bedroom -- so two more quilts were assembled, quilted and mailed for her birthday, later in April (one of these is pictured above).

The white sashing could have been cut from 1 1/4-inch strips, which is what we get when we cut the 2 1/2-inch "dollar" strips in half, lengthwise; instead, I cut 4 1/2-inch strips and sewed narrow lengths of green along the top:  the tiny green squares required slightly more than a single 2 1/2-inch strip could provide.  Sixteen 4-patch blocks were made from four of these 2 1/2-inch strips (two light and two darker).

5-inch "nickel" pieces, which could have been made into half-square triangle blocks, were cut down into 4 1/2-inch squares.  The seven 10-inch squares were also trimmed (to be 9 1/4"), to accommodate the units made by 2 1/2-inch strips; they could have been made into quarter-triangle squares with more work and a little less obvious waste -- but the idea was to keep things simple for the pattern.  The result was slightly larger than a square baby quilt; I added additional squares and some extra narrow borders to bring my green throw (pictured here, exploded and finished) to a more useful size.  This has been a pretty popular quilt around our house, resting at the moment at the foot of my bed.  My father-in-law particularly admired it, so perhaps a fifth one will be in the works for Christmas.

What with the interruption of a funeral and a load of other projects, this quilt was not completely bound by the time we were supposed to leave for the eight-hour trip to stay with Mom and help with her yard work (and quilt show) over Spring Break.  Mom's friend Debbie came to my rescue, hand-stitching the binding in time for the show!  A week or so later, when my sister's quilts arrived unbound (her new baby will be a girl and her old one is a boy -- and I wasn't sure how matched she wanted their quilts --), generous Debbie whisked the package home and promptly bound them for her.

Mom's idea for the quilt she could make for the show was simple enough, but she ran out of time.  She sent me home from the funeral with the fabrics we had bought when Dad was in the hospital, along with some simple verbal instructions.  Using fusible interfacing and sewing right sides together, I stitched around the edges of circles of fabric to make "coins."  Snipping around the curved edges of each seam allowance, I turned the fabric circles right side out through a slit in the interfacing and finger-pressed the curves until each circle was fairly flat.  It was a simple matter to iron these circles onto the charcoal-tone background sheet; they stayed in place as they were machine-stitched in place.  Pennies and nickels were appliqued with a straight stitch, but I used a more decorative stitch on the other coins to simulate the ridged edge of nickels, dimes, and so on.  It was machine quilted with a lavender metallic thread.  Mom had fun pointing out the "pair-a-dime" and the "two cents" in the corner.  She appliqued the quilt's title when she entered the quilt in a later show.

Baby Quilts for Grandma


What would Grandma want for Christmas?  Why baby quilts, of course -- Grandma has as many babies as everyone else, put together!

Janet, my mother-in-law, has more than fifty grandchildren; she is now in the Great-Grandma business.  Most years, my Christmas gifts to her have been stashes of playthings for her Grandma house:  in years past, I have given bins of Duplo Lego sets, vintage dolls revitalized with sets of handmade dresses, and scores of dress-up clothes (a perennial favorite).  This year, I noticed that her baby quilts are getting a little threadbare, so I began working on a couple in fabrics that I knew she would like.  They were not completed until after the new year, but she said she didn't mind.

When their children were young, my in-laws spent eleven years in Hawaii; six of their eleven children were born during these years.  Ten years ago, just before retiring, my father-in-law did an exchange and worked for a year at BYU-Hawaii, where he had worked before.  Their old friends were delighted to see them!  While they were there, my husband and I paid them a visit.  The island was rained out that week, but I gave Janet some money and she later brought back these fabric strips for me to put in a quilt.


They were a little irregularly-shaped, so they stayed in my stash until this year's need.   The design for this baby quilt was the solution to the problem of how to waste as little as possible.

Janet loves batik fabrics and our shared favorite color is a beautiful turquoise hue.  This swirled batik seemed to soften the bright Hawaiian prints for a baby quilt.  Both quilts share a similar flannel back and are bound with the same swirled batik.

The second quilt was an assortment of bright batiks, cut into squares.  Janet has a quilt on the wall in her study that she made of a rainbow of similarly assorted brights, so I took my cue from that.  She seemed to like the quilts and has temporarily put them on display on her front room couches.  They are machine quilted, which I figured would hold them together well through multiple washings.


My Lesson in Machine Quilting

I learned free-motion quilting from my mother, several years ago.  She lived in Washington and I had a baby shower and needed to take a gift (that evening), so I telephoned her.  Mom told me the basics -- that you need to eliminate the influence of the feed dogs (either by covering or by lowering) and that it works best if you use a presser foot designed to allow for the bulk of a quilt.  She told me to lower the tension and that I should secure the fabrics to the batting using a fabric spray, as well as encouraging me to get a fairly low-loft batting (and she had a suggestion for that).

That first baby quilt was pretty rough!  I arrived late to the shower and found it packed.  They opened my gift and passed it around so everyone could see it -- and I was mortified, since the stitching was so irregular I feared a baby might catch its toe on the biggest threads!  Ladies I did not know (my neighbor had only recently moved from California) were asking me questions that indicated they knew much more about it than I did.  My only comfort was...there was no real comfort in this situation, but I imagined these ladies would probably never see me again.

Needless to say, I kept at it.  The borrowed foot was returned to my mother-in-law and I got one of my own for my birthday (that was the birthday date that was interrupted when my husband got called to bail out one of his business associates from jail and never was paid back).  That birthday present has been well-used and was a great investment! 

I got better over time.  The positioning spray had to be used outside (it was cancer-causing and inhibited breathing, apparently) and it was expensive and somewhat problematic, so after awhile I gave up on it and use straight pins instead.  I learned baby quilts were easier to work on, but even when the backing shifts, it is not too noticeable (unless I sew over folds on the back), once shrinkage and the charming puckering sets in.  I had hand-quilted some twin-sized quilt tops for my daughters and had one left; what had taken weeks and late-night books on tape to finish was accomplished during a single movie (a long movie, but I was able to watch the end of it with my girls).  I still love to hand quilt, but usually a quick baby gift is ready for binding after an hour on the machine.

A few months after I started machine quilting, I went to visit my mother.  She had some projects for me to do and she asked me to show her how to machine quilt.  "But, Mom," I remonstrated, "you taught me!"  She then admitted she had never done it: she had once had it explained to her and she had merely been repeating the instructions!  The real key is practice. 

Potholders, like the ones used to illustrate this article, are great practice:  they are a small project and the backing stays pretty stiff and straight.  When you are done, you're done.  You can take comfort in knowing they will get used and stained and thrown away.  And, as a bonus, you can practice making and installing binding (a 10" potholder has a lot less investment and the same number of corners as the biggest king-sized quilt you can imagine).

Friday, December 30, 2011

Stash Giveaway Follow-up Report

This project has turned out differently than I had originally envisioned.  During the course of the year, instead of personally finishing fifty-two quilts, I only completed a couple of dozen or so and gave away enough fabric and other supplies to have made more than the fifty-two I had intended!  Cleaning out the basement and hall closet fabric stashes with an intent to move out of state necessitated such a purge.

My friend Jennifer came over today to show some of the things she has done with fabric I shared with her.  I hope other friends and relatives have had similar fun with what they took home.

 This quilt was made with some darling blue fabric with cowboys on it.  It was a Christmas gift for one of Jennifer's sons.  My mother gave me this fabric, probably to be a backing for one of the quilt tops she sent for my own little cowboys, but they had very definite ideas about what they wanted on the backs of their quilts!  The red flannel on the back is a very soft one, originally purchased to do a project for a neighbor.

  These denim quilts were made from jeans that I had collected for the same purpose, and the flannel backs were purchased at a great price several years ago.  Jennifer made a quilt for her husband, then I think she made three more for her sons!  I have been on several denim quilt kicks in the past thirty years, making "emergency quilts" for each of our family's vehicles and as Christmas gifts for the families of my husband's siblings, neighbors, and friends.  For our family, they have mainly served for emergency picnics, but they have also come in handy for cushioning on campouts, hiding Christmas surprises after shopping trips, and as cozy wrapping during evening rides home in the wintertime.


 This fabric did not all come from the same store, but I sure felt clever to find a flannel to coordinate with the designs I got for the front!  A local quilt store had a kit that made up into a baby quilt in very feminine colors and prints; this was cut out as an attempt to re-do the design for a baby boy.  After a decade, I never got to assembling the sewn blocks, but Jennifer finished it!  She also did the machine quilting.  This design, sewn in a set of yellow-on-white fabrics for a friend's nursery, was the pattern I used on the very first free-motion, machine-quilted project I ever attempted.


This is the back of one of Jennifer's denim quilts.  She has done a clever job of stretching the scraps and making it into a nice framed piece.   The lighter-colored fabric was a very soft one that I had always wished would grow more yardage if it sat long enough in its box.  Jennifer made it work.
Jennifer's daughter made this quilt.  She first pieced the grid, then she appliqued the palm tree on the front.  It is tied onto a soft clouds-in-the-sky flannel backing.  She was rightly pleased with her work, and beamed as she showed it off this afternoon.
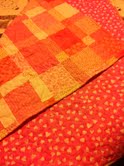
  I love fabric with hearts, and have collected quite a few over the years.  These blocks were made by cutting nine-patch blocks into quarters.  I had intended to set them together in a quilt for my sister's 40th birthday, but the birthday arrived before I finished; I imagined the blocks were probably happy when they went away to a new home.  Jennifer's younger daughter was so delighted with this feminine quilt that she required a bit of coaxing to part with it long enough for me to get a look at it!  The back was a Wal-mart find, purchased with a baby gift in mind.  Jennifer quilted little hearts in her stipple-strings; it turned out very well.


 I made several of these square-dance pinwheel quilts, and had quite a few solid squares saved to make another.  Jennifer wondered what I had had in mind for this and it was difficult to try to explain without actually bringing the pattern over.  I actually like the way Jennifer has spread the color throughout this bright, cheery quilt better than the demonstrations in the book.


Many, but not all, of the flannels Jennifer used for this strip quilt were from the stash of leftover flannel pieces from my basement stash.  These strip and snip quilts are quick to make and can be very warm.
Jennifer's oldest daughter saw a little yellow tulip block that I had made up nearly 18 years ago and got an idea to make a quilt in multi-colored fabrics to represent the Young Women Values.  Jennifer made the square borders for this quilt and they all tied the quilt this morning.  It was so pleasant to see Jennifer's daughter's delight at completing this quilt and to hear her children say how fun it was to work together on this project!  That, for me, is one of the most rewarding aspects of sharing sewing activities with my own children.

Friday, September 16, 2011

Carnival!

September is one of the best times of the year!  The garden produce makes wonderful dinners, the orchards are loaded with fruit, and the evenings and mornings have a crispness that reminds us that winter is coming.  It also spells the excitement of school starting again, and that inevitably brings the school carnival.

 I do not know why the schools choose September for this annual event.  They have just picked everyone's pocket for fees (nearly $300 for each junior high or high school student), and many people shell out money for new school clothes, too --- nobody is ready for another fundraiser!  This weekend, our family has two carnivals, back-to-back; four children attend one grade/middle school and a fifth is in another.  And each child is to donate something.  So that means quilting for me.

In one school, the students from each grade assembles themed gift baskets.  Our kindergartener took a pink quilt, nearly 45 inches square, to contribute to the baby gift basket his class was working on.  Our other children, whose classes gathered camping, golf, or spa collections, were given other items.  This cheery quilt, cut and completed after kindergarten one afternoon, was bound to be my favorite!  Many of the fabrics had hearts or bubble dots.  It was sent off to school the following morning.

The purple sister of the first quilt was sewn together and sent off the day after its twin.  The three-and-a-half-inch squares were cut at the same sitting as the pink ones were.  Strips were sewn together in threes, then these were cut into strips of three squares.  Stitched together in random Nine Patch blocks, they were shuffled into place on the floor in such a way that no matching squares shared a side.  Sixteen blocks were stitched together, then an extra row was sewn onto two sides, to make thirteen rows (just because I think an odd number of rows looks more pleasing.

I cannot say which ended up being my favorite, for each is charming.  The meandering, loopy, stipple quilting will make the cotton batting in each pucker nicely when it is washed.  Each quilt is backed with flannel, which I think is cozy for the coming cold weather --- one of the "real" reasons we make quilts!